Building Linux for the Parallella Platform
Introduction
The goal of this document is to provide a complete guide on how to build an SD card image used for booting Linux on the Parallella board. This document can be used as a follow-up to the Parallella Platform Reference Design post, or as a standalone guide. Each major SD card image component (FPGA bitstream, boot loader, root file system, etc) can be built using this how to guide or downloaded as binaries from the Parallella FTP Site.
Main Stages of the Flow
The flow to create an SD card image for booting Linux on the Parallella board consists of the following stages:
- SD Card Preparation
- BOOT Image Generation
- Bitstream Generation
- First Stage Boot Loader
- U-Boot Building
- Linux Kernel Building
- Device Tree Generation
- Root File System Installation
The flow presented in this document is partly based on the published documentation contained on Xilinx and Analog Devices wiki pages. Specifically, the following wiki pages were used as a reference guides for creating this document:
Zynq U-boot
Zynq Linux
Linux with HDMI video output on the ZED and ZC702 boards
The boot loader and the Linux kernel used in this flow are based on the Xilinx Zynq U-boot solution and the Xilinx Zynq Linux kernel respectively. The foundation kernel code and boot loader code are taken from a specific snapshot at the Xilinx Git server. Git patches are used to complete the Parallella platform installation.
Note: This user guide provides the information on how to build an SD card image for booting Linux on Parallella system without HDMI monitor support (i.e. “a headless system”). In order to create a system with HDMI video and audio outputs, developers should follow Linux with HDMI video output on the ZED and ZC702 boards provided by Analog Devices. The ADI’s source code for building the Linux kernel should be used in that case, since it includes all the necessary device drivers for such a system.
Note: The flow described in this document was performed using Xilinx ISE 14.4 Design Suite. Please refer to Xilinx Installation and Licensing Guide (UG798) for the software installation.
Note: GNU tools are required to build U-boot and Linux kernel. Please refer to Xilinx Zynq Tools wiki pages for more info.
It is recommended to download parallella16_prototype_sd_files.tgz tarball under parallella/ folder of Parallella FTP Site, and compressed zedboard_parallella_12121800.zip file, which can be found under parallella/sd_images/ folder.
Once downloaded and uncompressed, you will find the following files and directories under the parallella16_prototype_sd_files/ directory:
- zynq_fsbl_0.elf – First stage boot loader (FSBL) executable file
- parallella16_prototype.bit – Bitstream file generated according to the Parallella Platform Reference Design user guide.
- parallella16_prototype_uboot.elf – U-boot image
- uImage – Linux kernel image
- devicetree.dtb – Device tree blob
- BOOT.BIN – Boot image
- gitpatch/ – Directory containing patches for Xilinx source code
- doc/ – Documentation directory
SD Card Preparation
The SD card is used as a boot device for the Parallella board. In addition, the root file system is installed on SD card, and as a result frequent and heavy usage of the SD card is expected in the active Parallella platform. We have tried using a few different SD card brands and so far found SanDisk’s 8GB-SD-SDHC to be the most reliable for our needs.
There are two ways to prepare an SD card for booting the Parallella board. The method of choice depends on whether the developer will use the root file system provided by Adapteva or a different root file system.
- Use SD card image provided by Adapteva.
- unzip zedboard_parallella_12121800.zip
- use win32diskimager (or any other program of your choice) to write the image to SD card
- remove all of the files under BOOT partition since we are going to populate it with the newly generated files (rm /media/BOOT/*)
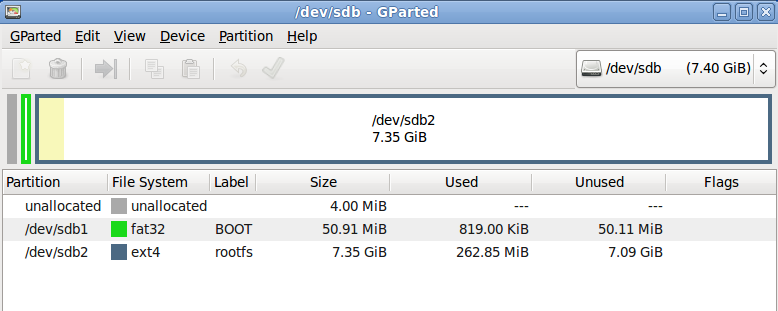
- OR, Use SD card partitioning tool (e.g. GParted) to create two partitions
- The first partition will hold the boot loader, devicetree and kernel images. It should be about 50MiB in size, and formatted with FAT file system. Label this partition as BOOT
- The second partition will occupy the rest of the available space. It will store the system’s root file sytem, and should be formatted with ext4 file system. This partition should be labelled as rootfs
Note: The SD image card provided by Adapteva comes with a pre-installed Ubuntu 11.10 root file system from Linaro.
BOOT Image Generation
The BOOT image is stored on the SD card, which is used as a Parallella platform boot device. The boot process starts with the execution of the on-chip ROM code by one of the ARM processors. The on-chip ROM code is responsible for loading the first stage boot loader, which in its turn, configures FPGA with the bitstream, initializes and configures Zynq processing system, and loads and executes the Linux U-boot image.
You can use the previously downloaded BOOT image (parallella16_prototype_sd_files/BOOT.BIN) or create a new one using the Xilinx SDK. The process of creating BOOT image consists of the following steps:
- Generate a bitstream.
- Create the first step boot loader executable file.
- Build U-boot image.
- Create BOOT image using components generated in the steps 1-3.
Step 1 – Bitstream Generation
Note: To skip this step, use the previously downloaded bistream file (parallella16_prototype_sd_files/parallella16_prototype.bit)
The complete Parallella platform reference design flow with all the details of bitstream generation process is covered in the Parallella Platform Reference Design user guide.
Step 2 – First Stage Boot Loader
Note: This step is assumed to be performed from the earlier generated and implemented PlanAhead project, parallella16_prototype.ppr, as described in the Parallella Platform Reference Design user guide. To skip this step, use the previously downloaded FSBL executable file (parallella16_prototype_sd_files/zynq_fsbl_0.elf)
- Start the PlanAhead tool
- Select Open Project, choose ./parallella16_prototype/parallella16_prototype.ppr and click OK
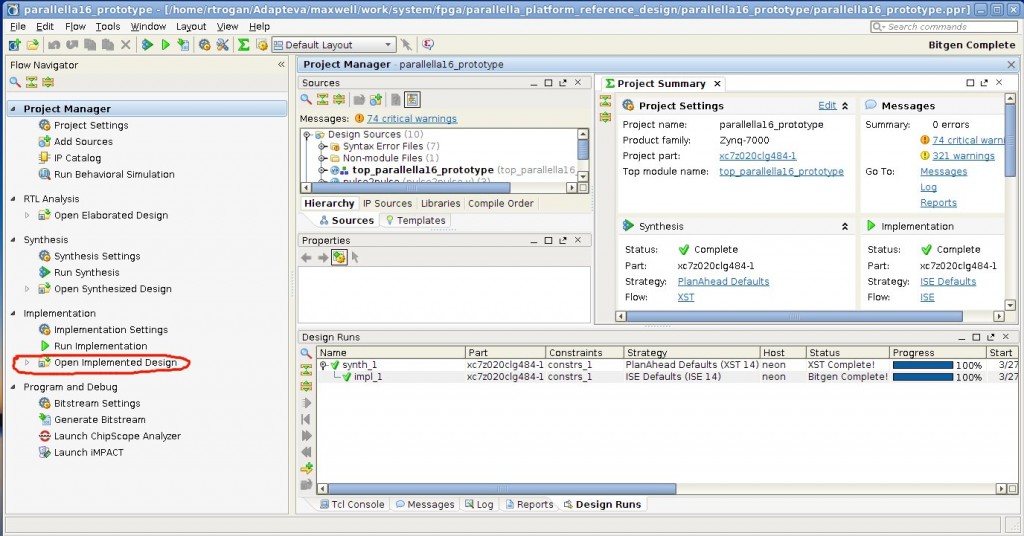
- In the Flow Navigator window, click on Open Implemented Design. Ignore any critical messages that appear.
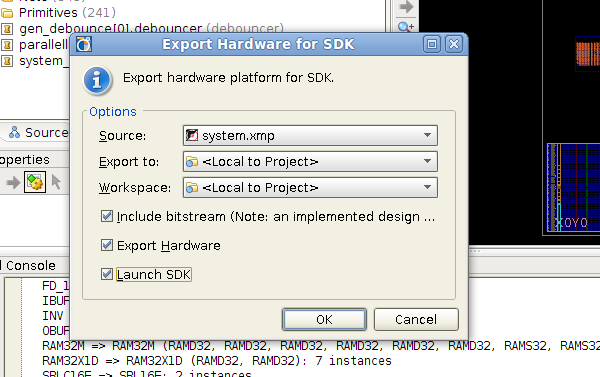
- Export Hardware and Launch SDK: File->Export->Export Hardware for SDK. In the Export Hardware dialog box, check Launch SDK. By default, Include bitstream and Export Hardware should be checked too. Click OK to start SDK.
- In SDK, File -> New -> Application Project
Use the information provided in the table below, to fill up the New Project wizard screens
| Wizard Screen | Property Name |
Property Setting/Selection |
| Application Project Screen | Project name | zynq_fsbl_0 |
| Use default location | Leave this checked | |
| Hardware Platform | system_hw_platform | |
| Processor | ps7_cortexa9_0 | |
| OS Platform | standalone | |
| Language | C | |
| Board Support Package | Create New, zynq_fsbl_0_bsp | |
| Templates Screen | Select Zynq FSBL and click Finish | |
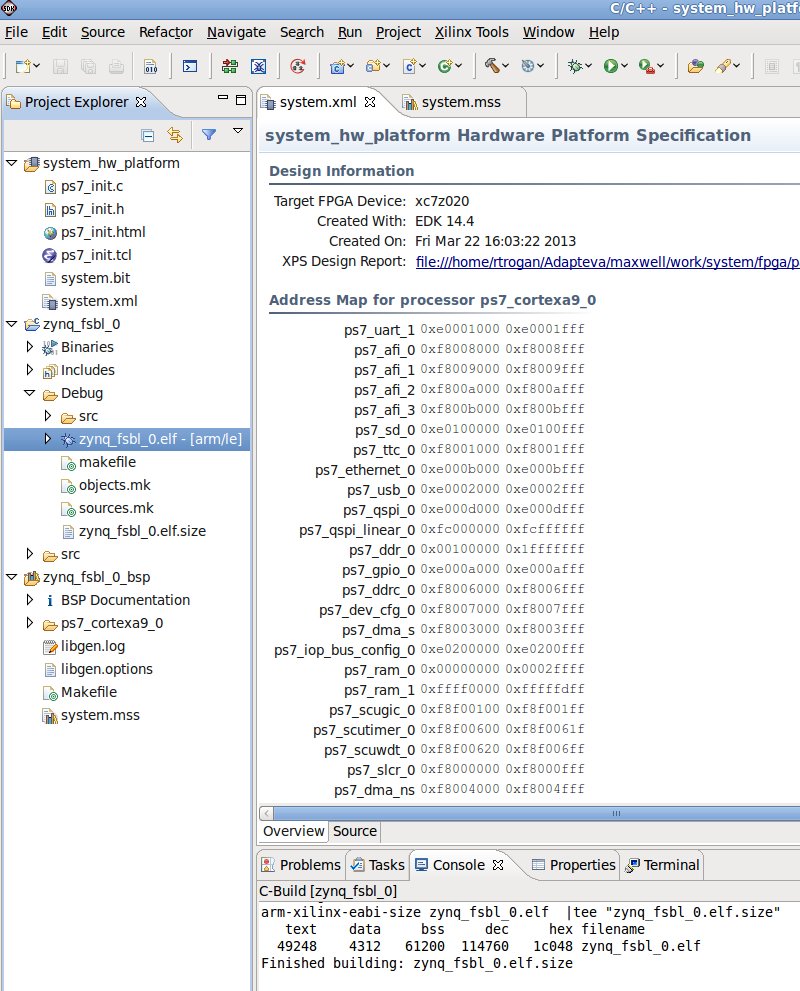
The zynq_fsbl_0.elf file supposed to be generated at this point and can be found under zynq_fsbl_0/Debug
Step 3 – U-boot Image Building
Note: To skip this step, use the previously downloaded U-boot file (parallella16_prototype_sd_files/parallella16_prototype_uboot.elf)
The U-boot for Parallella platform is based on Xilinx Zynq U-boot solution. Currently, we made only minor changes to the source code and therefore, at this point the configuration and building of U-boot is based on the source code from the Xilinx Git server. In order to not be affected by the future changes in the Xilinx source code, we are using xilinx-v14.4 tag of the u-boot-xlnx.git project.
Note: The “patch_path” notation in the bash commands below indicates your local path to the downloaded patchfiles.
Note: GNU tools are required to build U-boot. The “gnu_path” notation in the bash commands below indicates the path to the installed tools.
Downloading and Patching the U-boot Source Tree
bash> git clone git://git.xilinx.com/u-boot-xlnx.git
bash> cd u-boot-xlnx
bash> git checkout -b xilinx-v14.4 xilinx-v14.4
bash> patch -p0 < "patch_path"/parallella16_prototype_sd_files/gitpatch/parallella_uboot.patch
Configuring U-boot
bash> export ARCH=arm
bash> export CROSS_COMPILE=arm-xilinx-linux-gnueabi-
bash> export PATH="gnu_path"/CodeSourcery/2012.09/lin/Sourcery_CodeBench_Lite/bin:$PATH
bash> make zynq_zed_config
Building U-boot
bash> make
Once finished, the U-boot executable file (u-boot) will be created in the root directory of the U-boot source code. This file should be renamed to parallella16_prototype_uboot.elf
Step 4 – BOOT Image Creation
Note: To skip this step, use the previously downloaded BOOT image file (parallella16_prototype_sd_files/BOOT.BIN)
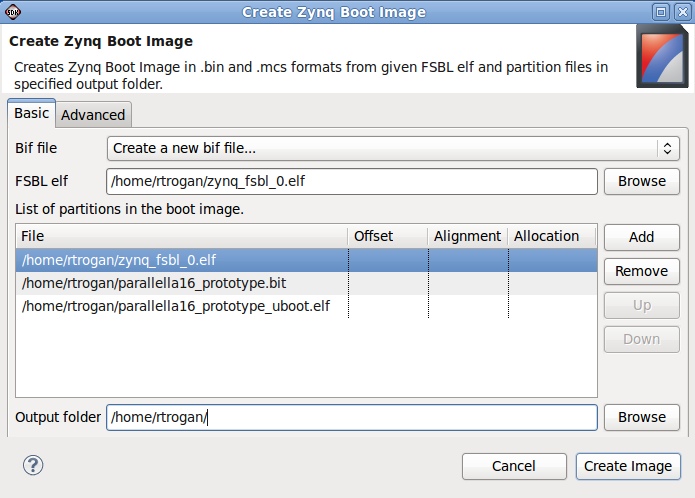
- In the SDK, select Xilinx Tools -> Create Zynq Boot Image
- Select FSBL file created in Step 2
- Add bistream file generated in Step 1
- Add U-boot file built in Step 3
- Select the Output folder, and click on Create Image
Note: The order of the files in the List of partitions in the boot image is important.
The generated file, which by default will be named after U-boot file (in the above example – parallella16_prototype_uboot.bin) should be renamed to BOOT.BIN and copied to the BOOT partition of the SD card:
bash> cp BOOT.BIN /media/BOOT/
Linux Kernel Building
Note: To skip this stage of the flow, use the previously downloaded Linux kernel image (parallella16_prototype_sd_files/uImage)
The Linux kernel for Parallella platform is based on Xilinx Zynq Linux kernel, which in its turn is based on the 3.0 Linux kernel from kernel.org and has Xilinx BSP and drivers additions. Currently, we made only minor changes to the source code and therefore, at this point the configuration and build process of the Linux kernel is based on the source code from the Xilinx Git server. In order to not be affected by the future changes in the Xilinx source code, we are using xilinx-v14.4 tag of the linux-xlnx.git project.
Note: The “patch_path” notation in the bash commands below indicates your local path to the downloaded patchfiles.
Note: GNU tools are required to build Linux kernel. The “gnu_path” notation in the bash commands below indicates the path to the installed tools.
The build process described below creates files named Image, zImage, and uImage located in the arch/arm/boot directory of the kernel tree. The Image file is a non-compressed kernel image, the zImage file is a compressed kernel image which will uncompress itself when it starts. For booting Linux on Parallella platform we are using uImage file, which is a kernel image wrapped in a u-boot mkimage wrapper.
Note: In order to properly build the uImage, the path to the downloaded U-boot Xilinx tools has to be added to the $PATH variable, so that the kernel compilation process can find the mkimage command. The “u_boot_path” notation in the bash commands below indicates the path to the downloaded u-boot-xlnx.git project.
Downloading and Patching the Linux Kernel Source Tree
bash> git clone git://git.xilinx.com/linux-xlnx.git
bash> cd linux-xlnx
bash> git checkout -b xilinx-v14.4 xilinx-v14.4
bash> patch -p0 < "patch_path"/parallella16_prototype_sd_files/gitpatch/parallella_dts.patch
Configuring Linux Kernel
bash> export ARCH=arm bash> export CROSS_COMPILE=arm-xilinx-linux-gnueabi-bash> export PATH="gnu_path"/CodeSourcery/2012.09/lin/Sourcery_CodeBench_Lite/bin:$PATHbash> exportPATH="u_boot_path"/u-boot-xlnx/tools:$PATH bash> make ARCH=arm xilinx_zynq_defconfig
Building the Linux Kernel
bash> make ARCH=arm uImage
The uImage file which is supposed to be generated at this point, can be found at arch/arm/boot directory of the kernel tree, and should be copied to the BOOT partition of the SD card.
bash> cp uImage /media/BOOT/
Device Tree Generation
Note: To skip this stage of the flow, use the previously downloaded device tree blob (parallella16_prototype_sd_files/devicetree.dtb)
Device tree contains the hardware platform related information which is used by the Linux kernel to initialize itself. The compiled device tree blob is loaded into the memory by U-boot before the Linux kernel is started. We are using zynq-zed.dts device tree file, which is located under linux-xlnx/arch/arm/boot/dts/ directory. The following modifications were applied (parallella_dts.patch) to the original file provided by Xilinx:
- bootargs was changed to support the boot of root file system from SD card instead of booting Ramdisk image from ram.
- memory system size was changed (limited). By doing this, we get a shared memory slice to be used by the ARM processors and the Epiphany chip, but not seen by the Linux kernel.
Compiling the Device Tree
bash> scripts/dtc/dtc -I dts -O dtb -o arch/arm/boot/zynq-zed.dtb arch/arm/boot/dts/zynq-zed.dts
At this point zynq-zed.dtb will be created in the arch/arm/boot/ directory. The file should be renamed to devicetree.dtb and copied to the BOOT partition of the SD card.
bash> cp devicetree.dtb /media/BOOT/
Root File System Installation
It is recommended to use the root file system provided with the SD card image (zedboard_parallella_12121800.zip), because it comes with all of the pre-installed packages and tools needed to work with Epiphany chip.
Alternatively, a clean root file system can be downloaded Linaro Download Page. Here is an example of how to download and install Ubuntu 12.04 from Linaro:
Downloading Linaro Ubuntu ARM Root File System
wget http://releases.linaro.org/12.04/ubuntu/precise-images/ubuntu-desktop/linaro-precise-ubuntu-desktop-20120426-119.tar.gz
Extracting the Root File System onto the SD Card
sudo tar --strip-components=3 -C /media/rootfs -xzpf linaro-precise-ubuntu-desktop-20120426-119.tar.gz binary/boot/filesystem.dir
Booting Linux on Parallella Platform
At this stage of the flow the SD card is supposed to be prepared and ready to use. It should contain the root file system under rootfs partition and following files under BOOT partition:
bash> ls /media/BOOT/
BOOT.BIN devicetree.dtb uImage
Insert the SD card in the SD card slot of the ZedBoard and turn on the power switch of the board.
It is important to remember that the preparation of the SD card image as described in this document was for the system without HDMI monitor support. We would recommend working with such a system remotely using ssh protocol. While the root file system of SD image provided by Adapteva has Ubuntu openssh package already installed, the developer will have to install openssh package by himself, if he uses cleanly installed root file system from Linaro.
To access the Parallella Prototype system (based on ZedBoard and 16/64-core Epiphany chip) before the ssh connection can be established, we recommend the Tera Term terminal emulator program.
- Connect a UART/serial port on the PC to the ZedBoard
- Start Tera Term terminal with the following configuration: Baud rate: 115200; Data: 8bit; Parity: none; Stop: 1bit; Flow control: none
Now, you can use ifconfig to find out the IP address of Parallella platform, install opessh package if needed (using sudo apt-get install), and start working with the system remotely.
Conclusion
This document describes the process of creating an SD image to be used for booting Linux on the Parallella board. The complete “headless” Parallella platform system, including the FPGA design and SD image preparation, can be built from scratch following this document and previously published Parallella Platform Reference Design user guide. We hope that the information provided in these two documents can be used as a starting point for building new interesting Parallella platform projects.
Disclaimer: PlanAhead, Zynq are trademarks of Xilinx, Inc. This document does not imply any endorsement or approval by Xilinx, Inc.
 Next Post